Sitecore Preview Mode - see what is personalized
Posted 28 March 2015 by Marek Musielak
Sitecore personalization is a brilliant functionality. Every Sitecore implementation should make a proper use of it. If your application doesn't, it simply does not take the advantage of what Sitecore is capable of.
One thing I've always missed in Preview Mode of Sitecore Page Editor is an option to see which components are personalized and how do they look like in every personalized variant. You can do this in Edit Mode, but all the Sitecore javascripts, reloading the page when selecting personalized version and additional html tags added by Sitecore, they all intrude with proper initialization of components and with ease of use. This blog post explains how I added functionality of previewing Sitecore conditional renderings to the Preview Mode of Sitecore Page Editor. Video below shows how it works:
When you add a new rendering to a Sitecore item, what Sitecore does in the background is changing the __Renderings field of that item. This field in fact is a bit of xml. Root tag is <r> tag, then there is a <d> tag for every device enabled for the item, and within <d> tags there are <r> tags corresponding to renderings added to the item. Sample value of a field with one rendering added to Default device could look like this (guids shorten to first 8 characters to make the xml easier to read):
<r xmlns:p="p" xmlns:s="s" p:p="1">
  <d id="{FE5D7FDF}">
    <r uid="{D38C9D5B}" s:ds="{A2F702B3}" s:id="{799686A0}" s:par="" s:ph="/middle" />
  </d>
</r>
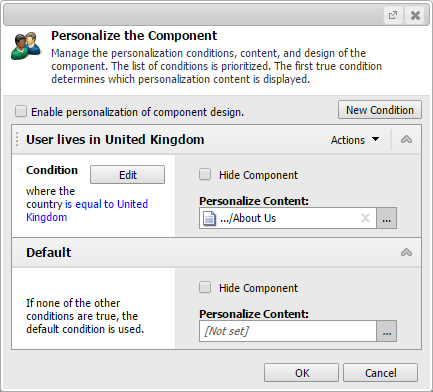
When you personalize a component, Sitecore adds another tags under the rendering <r> node. They describe what are the rules of personalization and what are the actions. E.g. when you use a GeoIP condition where the country is equal to United Kingdom to use different datasource for the component, your __Renderings field will look like that:
<r xmlns:p="p" xmlns:s="s" p:p="1">
  <d id="{FE5D7FDF}">
    <r uid="{D38C9D5B}" s:ds="{A2F702B3}" s:id="{799686A0}" s:par="" s:ph="/middle">
      <rls>
        <ruleset>
          <rule uid="{167CE3A4}" s:name="User lives in United Kingdom">
            <conditions>
              <condition uid="4B81D006" s:id="{331C6356}" s:operatorid="{10537C58}" s:value="{72829703}" />
            </conditions>
            <actions>
              <action uid="69D3F0C2" s:id="{0F3C6BEC}" s:DataSource="{FDEC8F21}" />
            </actions>
          </rule>
          <rule uid="{00000000}" s:name="Default">
            <conditions>
              <condition uid="485F0975" s:id="{4888ABBB}" />
            </conditions>
            <actions />
          </rule>
        </ruleset>
      </rls>
    </r>
  </d>
</r>
As you see, there are new tags added for the rules. First of them contains condition tag which holds the where the country is equal to United Kingdom condition and action tag responsible for using different datasource. Second <rule> tag (called Default) contains default condition and empty action, which means that base rendering configuration will be used. Now when Sitecore renders the component, it evaluates the rules to find the first one matching and applies actions assigned to that rule.
Lets play a little with Sitecore code which is executed when user is in Preview Mode. First, instead of evaluating the rules and displaying only one version of the component, lets change what we read from the xml in a way that there is separate rendering node for every rule and use default condition instead of what was defined.
This code works with Sitecore MVC only and does not support WebForms, but I'm sure you can easily copy the functionality to WebForms pipelines as well. The new xml element has now 2 <r> tags for renderings and each of them has only one rule which is always true and the only difference is the action for every rule:
<r xmlns:p="p" xmlns:s="s" p:p="1">
  <d id="{FE5D7FDF}">
    <r uid="{D38C9D5B}" s:ds="{A2F702B3}" s:id="{799686A0}" s:par="" s:ph="/middle">
      <rls>
        <ruleset>
          <rule uid="{167CE3A4}" s:name="User lives in United Kingdom">
            <conditions>
              <condition uid="485F0975" s:id="{4888ABBB}" />
            </conditions>
            <actions>
              <action uid="69D3F0C2" s:id="{0F3C6BEC}" s:DataSource="{FDEC8F21}" />
            </actions>
          </rule>
        </ruleset>
      </rls>
    </r>
    <r uid="{D38C9D5B}" s:ds="{A2F702B3}" s:id="{799686A0}" s:par="" s:ph="/middle">
      <rls>
        <ruleset>
          <rule uid="{00000000}" s:name="Default">
            <conditions>
              <condition uid="485F0975" s:id="{4888ABBB}" />
            </conditions>
            <actions />
          </rule>
        </ruleset>
      </rls>
    </r>
  </d>
</r>
If you would preview the page with those changes, you would see that both components are rendered one after another. That's why I've also written a code which adds html comment tags to outputted html that allows me to distinguish duplicated components from the standard components. Sample html comment tag looks like that:
<!--personalization-preview-start::53181ead-aab9-4dc4-ae7b-1c4c15c29ad9
    ::{FB79D35C-7B39-404E-BFC9-05F2307785A4}::Header::Big Font Needed-->
Now we need to hide all the versions except from the default ones using javascript. Important is that we do this as late as possible - the code is fired on window load. Thanks to that, if you have any javascript code which should be executed when page loads, it will find all the components on the page and will be able to initialize all of them properly. Then javascript code responsible for hiding duplicated versions (no dependencies on jQuery or other libraries, pure js - oh yeah, it was fun to write code in pure js) is executed and all non-default versions of components are hidden.
Next thing is additional button in Sitecore ribbon which enables personalization preview for current user. When it's clicked, information is stored in Sitecore user profile and this user will be able to use dropdowns to switch between every component variants.
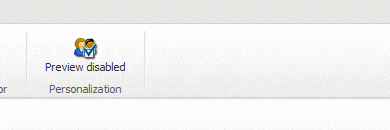
Personalization preview works not only for switching between datasources, it supports all the other personalization options including using different components or even hiding the component. The code is executed in preview mode only and only for the users who enabled it. It has no impact on the page editor or normal mode and on the normal mode performance.
You can download the package here Personalization-Preview-1.0.zip and source code here Personalization-Preview-1.0.zip. And here you can watch a video which shows how personalization preview works. Code is tested in Sitecore 7.2 rev 140526 but should be compatible with most of the Sitecore 6 and Sitecore 7 versions.
You've read the whole article? Thanks! Now let me know what do you think about it? Useful? Boring? Doesn't work for you? Leave a comment below.